Monday, December 28, 2009

Considerations when predicting the final gravity.

It seems that not a lot of people care to hit their estimated final gravity. Many state "you can't predict the yeast behavior" or " there are too many unknown variables that affect final gravity to include this in a tool", so people usually just accept what the brewing tools predicts. These tools ignore the fact that not all sugars are fermentables and apply the yeast attenuation suggested by the manufacturer to the whole amount of sugars.

Can you brew successfully that way? Yes you can, but hitting the required final gravity when you are trying to brew a specific style takes time and multiple batches until you make the needed adjustments.

So I decided to look at the behavior of one yeast strain that I use a lot, Wyeast 1056 American Ale, using empirical data recorded from several batches in order to come up with a better way when predicting the final gravity.
The analysis included all grain recipes with variable grain bills for multiple styles, from light beers up to brown ales, all using Wyeast 1056.
When looking at the graph of mashing temp against final gravity, there was a visible relationship, already known by most people.
It also shown that the suggested attenuation from the manufacture was quite off.
The graph below shows the mashing temperature in the bottom and the related attenuation on the top. The flat lines are the suggested maximum and minimum yeast attenuation. Fermentation temperatures were within the suggested range for this yeast, from 60 to 72F.

From this graph, it is clear that the higher the mashing temperature, the lower the attenuation, as expected. Based on that and using the available data points, I came up with the following function:

Attenuation%=50+800/(T-130) (for T from 150 to 160F)


where T=mashing temperature


Now, using this function, the graph below shows the predicted attenuation in red for the same batches. It would represented much better the real measured data than by just using the suggested range of 73 to 77%, which again, is way off.


It is known that many other factors affect the final gravity, but since mashing temperature seems to be an important one, using this simple function can improve the accuracy when predicting FG.

The actual graph for the function is shown below.


Another step that also help improving accuracy when estimating the FG is to exclude the dextrin sugars and other known non-fermentables from been attenuated, like carapills malt and lactose, usually added to increase head retention and body of the beer.
My basic excel calculation file do just that, by letting the user assign the estimated fermentables for each grain or adjunt.


Saturday, December 19, 2009

Brewing a Dunkelweizen


First time brewing this style. A wheat beer with some malty notes sounds delicious!
Here's the recipe. Brewed it today and it is right now at 70F in my fermentation chamber. Will lower to 62F once fermentation has started.


  • 5.5# Weyerman Wheat Malt


  • 3# Munich Malt


  • 0.5# Cara-Munich Malt - Belgian


  • 3oz Weyerman Carafa Special II


  • Wyeast 3098


  • 1oz Hallertau 4% hops for 60min


Mashed at 155F for 60min. OG at 1.044, which was lower than my target of 1.051 but still within the range for this style. Mashing efficiency at 65% instead of estimated 75%, possibly due to the large amount of wheat malt used.


Click HERE to see the review of this batch.

Carbonation test

My first batch of beer was a partial mash extract recipe and one thing I wonder was how much of those priming sugar drops I should use on a 22oz bottle to properly carbonate the beer. I also wondered how much pressure would be building up inside the bottles and creating bottle bombs was a concern.
So I decided to do a simple test by using a plastic bottle with a psi gauge attached to the cap to measure the pressure for the recommended 3g of sugar per bottle. Also tested 6g per bottle to see what impact that would have on the pressure.

Here are the photos of the setup


The results were a little surprising. The bottle with 3g of sugar had a pressure actually higher than the one with 6g of sugar. But after about 10 days, I decided to shake the bottles a bit since I was wondering if the sugars were just sitting to the bottom and not really well mixed into the beer. It seems the CO2 was dissolved in the beer and once shake, the pressure on the bottle with 6g of sugar became higher. Later, both bottle were set into the fridge and pressure on both dropped, as expected. The maximum pressure registered was 36PSI for the 6g bottle and 30 PSI for 3g of sugar. Those same amounts of sugar was also used for regular 22oz glass bottles. So as a result of this test, I figured that 36PSI is not enough to turn the bottles into bombs and I could compare what carbonation levels 3g and 6g of priming sugar would create.

Here's a graph of the results.


Monday, December 14, 2009

Brewing a Belgian Wit

Belgian wit is a very refreshing beer with lots of wheat malt and spices and is one of my favorites.

Here is a recipe I have brewed few times that I recommend:


  • 5# Belgian pilsner malt 1.5L


  • 3# wheat malt 1.8L


  • 1/2# Briess aromatic


  • 2# Flaked wheat


  • 1/4# flaked oats


  • 1# rice hulls


  • Wyeast 3944 Belgian wit


  • 1/2oz Kent golding for 60min


  • 1/2oz Kent golding for 30min


  • 1/2oz Kent golding for 10min


  • 1 tsp Irish moss for 20min


  • 1/2oz sweet orange peels


  • 1/2oz bitter orange peels


  • 1/4oz cracked coriander


  • 1g cracked paradise seeds

The spices were added to the boil for last 10min inside a muslin bag. The numbers for this batch were:


OG=1.050


FG=1.008


ABV=5.4%


Color=6


IBU=18


Mashing temp was 154F and fermentation temp 62F. It took 10 days to reach FG. Here's the graph of the fermentation profile. Click on the image to see it larger.

And here it is, ready to drink.


Brewing a malzbier


Malzibier is also known as an energy drink and is a a low alcoholic beer, very sweet and dark. It is achieved in commercial scale by pitching the yeast in the wort at very low temperatures, close to 32F. That process slow down the yeast activity so after few days, most of the sugars are still there, then it is pasteurized and forced carbonated for bottling.

Malzbier is very common in some countries, specially in Brazil and it is very different from what is called "Malta". I have tried Malta recently for the first time to check if it would be like malzbier but it was very disappointing. Malta is pretty much a sweet wort, sorry for those that like it, but it just doesn't taste like beer at all. I tried few different brands and all were almost the same, sweet wort with lots of molasses. Not good!

Back to what a malzbier should taste like, it definitely taste like beer, it is sweet but not as much as Malta.

I finally decided to give it a shot and brew something like it, a low alcohol beer with strong coffee taste and sweetness. The problem with homebrewing that is the required pasteurization process, so I decided to brew it using a low fermentable wort by adding lots of dextrin malt and lactose.

My plan was to have most of the sugars left after fermentation, so here's is my recipe:


  • 1# crystal 120L

  • 1# crystal 40L

  • 1# chocolate 350L

  • 1# briess aromatic

  • 3# Carapils

  • 2# Lactose

  • 1/2oz Horizon 13% for 60min

  • 1/2oz Hallertau 6% for 30min

  • 1/2oz Hallertau 6% for 10min

  • 1 tsp irish moss for 20min

  • OG=1.040/FG=1.030/Color=28/IBU=40/ABV=1%

  • Mashing temp=153F/Yeast=1084/Boil volume=6.5gals

  • Fermentation temp=70F

It has been couple of weeks in the bottles and it is still developing flavors but it taste a little different than what I recall from having a malzbier. It has a much stronger coffee flavor and despite the FG at 1.030, it doesn't taste that sweet at all. If I ever attempt this type of beer again, I may reduce the chocolate malt and add some chocolate nibs or other chocolate flavoring adjunct.


But the outcome was not that bad. It taste like beer, like a strong and sweeter brown ale.


UPDATE: Left a bottle of this brew sitting in my fridge for 18 month. Check the review of that bottle HERE.

Buying hops online


I just received a batch of hops that I purchased online from hopsdirect.com. It is so much cheaper to buy hops online, than from my LHBS. The minimum order is a pound and the price is something like 1/5 of my LHBS, so I a got total of 4#, divided in Centennial, Crystal, Hallertau and Goldings. I then used my foodsaver machine to vacuum pack in 1oz bags, then into the freezer. I should have hops for a year of brewing, for only $50. What about that? By the time I run out of hops, I should be harvesting my own hops that may yield over 3# next year.

Sunday, December 13, 2009

Brewing with consistency

Brewing the same batch twice and keep consistency on the final product is one of the most challenging things on home brewing. Keep track of most variables is the best way to achieve that. Some of the things to look at when trying to keep consistency are:

  1. Availability of ingredients - When we go to our LHBS with our recipe, sometimes we can't find the exact grain or hops we are looking for, so we end up having to replace those with whatever is the closest available compromising the outcome and your attempt to brew that batch that you liked. One way to avoid that is to stock some vital grains and hops so you make sure you use the right ingredients. Liquid yeast however is better to buy as you brew so you can get the fresher possible. Dry yeast can be stored for several month with no problems.

  2. Temperature control - Keeping fermentation temperatures under control is a very important step to re-create the same beer profile twice. That's when a fermentation chamber comes very handy. Many home brewers convert their chest freezers into fermentation chambers by replacing the thermostat, some other folks add a temperature controller. This approach seems to be very popular and can also work when brewing Lagers, which requires lower temperatures. My personal approach when I start thinking to build a fermentation chamber was that I would like to both heat and cool by carboy automatically, so it would allow me to brew either during summer, when temperatures reach 100F, and during winter with 15F outside. Some photos of my fermentation camber can be found HERE.
  3. Recording the variables - It is important to keep track of as many variables as possible in order to allow you to re-do a batch. Here's a list of the variables that I currently keep track on all my batches.
  • Detailed description of all ingredients, including name, brand, quantity, time in which it was added to the brewing process

  • Temperatures of the strike water, ambient, sparge water, initial and final mashing temperatures, mashing time, boil time, time of additions to the boil.

  • Measurements of the wort gravity when starting the sparge, end of sparge, pre-boil and final original gravity of the wort before pitching the yeast. Calculated mashing and brew house efficiency.

  • Fermentation temperatures, daily measurements of gravity during fermentation, which I use to build a chart of gravity x days. That's allows me to track the fermentation profile and identify possible issues even before it happens, like a stuck fermentation, which can be avoided if temperature is increased to keep the yeast working. Finally, track of the final gravity and calculated alcohol by volume, color and IBU's.

Below is an example of gravity chart for multiple batches. Gravity was taken daily. The green curve is for a Whitelabs 001 while all the others curves are for Wyeast 1056. All gray curvers are partial mash extract batches while the red and blue are all grain batches. Playing with fermentation temperatures, addition of dextrin malt and other changes are very visible when a chart like this is available. It gives me the ability to better predict the outcome of a batch just by looking the behavior on the first days of fermentation.


Thursday, December 10, 2009

Bottling your beer

Once you determined that your fermentation is completed by having 3 consecutive days of same gravity measurements on your hydrometer, now it is time for the last step, bottle your beer. Here's a list of equipment you will need sanitized prior to start the process:

  • A 6gal carboy where the beer will be transferred to and primed, then bottled.

  • Hose that will be used to transfer the beer from the fermenter to the bottling carboy and from that to the bottle

  • Bottle filler, bottles and caps

  • A big spoon or stick that you will need to stir in the bottling carboy

Here's the step-by-step to bottle your beer:


1) On your stove in a small pan, add 1 cup of regular sugar or priming sugar from you LHBS with 2 cups of water. Preferable water without chloride. Boil for 15min stirring few times. Let it cool till room temperature.


2) Pour the syrup from step 1 into the bottling carboy. Remove the stopper from your fermenter, then transfer the beer to the bottling carboy. Avoid splashing the beer. Oxygenation needs to be avoided at this point . Whether you use any syphoning method to transfer the beer or a spigot you previously attached to the fermenter, avoid the solids on the bottom of the fermenter. Those solids are the yeast that decanted along with the proteins. There will still be enough yeast in suspension that will promote the natural carbonation inside the bottles. Once the transfer is completed, stir the beer gently to make sure that the priming sugar is well mixed with the beer.


3) At this point, you beer is ready to bottle, attach your filling hose and bottle filler and fill each bottle, avoiding oxygenation of the beer. Fill each bottle leaving about 2 inches to the top. Now, using the bottle caper, close each bottle. Contamination can be an issue so take all measures to avoid contact with the parts that will touch the beer. Using a latex glove during this process is a good idea.


4) Leave the bottle at room temperature, in your garage or basement to develop and mellow the flavors as well to promote the natural carbonation. Wait at least 2 weeks, chill the bottle to you preferred drinking temperature, then taste your first batch of beer.


Wednesday, December 9, 2009

Step-by-step brewing process

Here is what I suggest as a step-by step process to brew 5gal of beer using malt extract:

1) Fill a container with water and dissolve the recommended sanitizing solution, perhaps star-san as recommended on previous posts. I usually make 2.5gals of solution which is plenty to sanitize all equipment. If using Star-san, for 2.5gals of water, use 1/2oz of the concentrated sanitizer. Soak the following equipment and leave it there. I'll flag in future steps the right time to remove then and let to dry.
  • All hoses that will be in contact to the wort, like those to transfer from the boil kettle to the fermenter.
  • The carboy that will be used for fermentation. Just pour a cup of sanitizing solution into it, shake it so it covers the whole inner surface, then let is drain upside down so the excess runs off.
  • Spigots, stoppers and air-lock parts
  • Funnel, the beer thief and strainers if used.

2) Setup the boil kettle and fill with 5 gals of water. Is it preferable to use spring water or water than has been filtered to remove as many Chloride as possible. You can get filtered water from you local grocery store using their refill machines and pay maybe $0.40/gal , buy bottled spring water which is more expensive, or have your own filter at home and use your tap water running thru the filter on demand. I use an acctivated carbon filter connected to my tap. That cost about $50 and the filter can last for a year.

Fire up you burner or stove and while waiting to bring it to a boil, mix in both the dry and liquid malt extract. Stir well so it gets completely dissolved, otherwise you may burn any deposits on the bottom of the kettle during the boil. Now keep your eyes on the kettle because it will foam up when the boil start and boil over can occur. To avoid that you can lower the heat as you see that the boil is starting and you can use a water spray bottle ( also filtered water ) to spray on the foam as it start to form. Few minutes after the boiled is rolling, the foaming will stop and you are mostly safe to keep it going but NEVER leave the kettle unattended.

The more vigorous the boil the better. A simple simmer is not good enough to promote the hot break of the proteins, explained in a previous post, so here's where a powerful burner comes handy.

3) Now that your boil is rolling, start a timer and count 1h of boil. This point will be called zero minutes. Now add the 1oz of the Cascade hop pellets to the kettle and let it boil.


4) At 40 minutes into the boil, add the 1 tea spoon of the Irish moss


5) At 50 minutes into the boil, add the 1oz of the Saaz hop pellets. Also, remove the items that were soaking in the sanitizing solution and let then drip or dry. You don't necessarily need then completely dry in order to use then.

6) At 55 minutes into the boil and just 5 minutes from you timer to complete 1h, place your wort chiller inside the boiling wort. This will sterilize the chiller to avoid any contamination of the work.

7) At 1h into the boil, shut the heat off, connect the water to you chiller and start circulating the cold water thru the chiller as you stir the wort so you improve the colling efficiency. It will take about 20 to 30min to bring your wort from 212F down to 75F, which is your target temperature. Use your thermometer to track the temperature until you reach that mark. Try not to splash much wort when stirring to avoid oxygenation, at least until you reach 80F. Once you reach 75F, shut down the water and remove your chiller from the kettle. At this point, you wort is susceptible to any contamination, so be careful to not let anything that was not sanitized to get into contact with the wort.

8) Now stir the wort in circular motion to create a swirl and let it sit still for 10min. That will decant some of the solids which is always good to keep out of the fermenter.

9) Take a sample of the wort with the beer thief and fill your hydrometer. Take a measurement. Write that down as your OG or original gravity.


10) Transfer the wort to the fermenter trying to avoid the solids on the bottom. You can let it splash into the fermenter a bit so it gets oxygenated. That is important because the yeast likes a well oxygenated environment to start working on the sugars.

11) Once all the wort is in the fermenter, get the yeast ready to pitch. The bag should be well inflated, what tells you the yeast is healthy and active. Shake the bag well, open it and pitch into the fermenter. Using a sanitized funnel makes the pitching easier.


12) Place the stopper and airlock. Fill the airlock until the mark with water or vodka, close it and you are done for the first and more "complicated" stage of the brewing process. You now need to try to keep your fermenter at temperatures from 60 to 70F which is the most recommended for the Wyeast 1056. Some people move the fermenter around from one room to another, to the garage or basement in order to keep that temperature range. Another method is to set the fermenter in the bath tub with water so it better stabilize the fermentation temperature, even adding some ice when you live on a very hot climate.

The fermentation should start in 12 to 24h, sometimes 36h. You will know it started because you will see the airlock bubbling, foam forming on the surface and movement in the wort as CO2 is generated. At this point, just leave it and check daily. If it start to spill foam over thru the airlock, remove the airlock keeping the stopper, attach 3ft of a sanitized hose to the whole and the other end in a bucket with sanitizing solution next to the fermenter. That should fix the mess. :-)

After 5 to 7 days, the activity on the airlock will slow down until you count 1 bubble per minute or less. That indicates the yeast have pretty much consumed most of the sugars and that the fermentation is almost completed. You should then remove the stopper and take a sample of the beer using the beer thief, previously sanitized, and measure the sugar levels with your hydrometer. Repeat this test daily until you measure 3 times the same value which will be your FG or final gravity. White that down and now your know that the fermentation is completed and you are ready to bottle.

Check the next post for the priming and bottling process.


Monday, December 7, 2009

Your first malt extract beer - Recipe


Here's a recipe to brew a malt extract beer. It will mostly take about 3h to brew this batch, which will then be left to ferment for few days, then bottled. After 2 to 3 weeks, you will be able enjoy your first home made beer.
The list of ingredients that you will need is listed below. You can get these from any LHBS, local or over the internet.
This recipe is for a gold ale, medium bitterness, not necessarily a clone of any commercial beer. As I lay down the ingredients, I'll explain what each are used for.


  • 3.3lb of light liquid malt extract (un-hopped). The most common brands are Muntons, Briess and Coopers. Any will work fine. This ingredient will provide the sugars for fermentation and malt flavors.

  • 3lb of Golden dry malt extract or DME. Will also be providing sugars for fermentation and flavor. The combination of both liquid and dry malt extract will compose the total available sugars for fermentation. This starting sugar concentration is important and called OG (original gravity) because it will determine how much alcohol your beer will contain. The more sugar available for the yeast to consume, the more alcohol it will generate during fermentation. There are limits on alcohol levels that each yeast strain can tolerate, but most will live with about 10% of alcohol by volume. Since most beers are about 5% abv, our yeast will still be alive once fermentation is completed. That is good news since we'll still need our yeast in order to provide a last time fermentation, now inside the bottle. Just before bottling, a limited and precised amount of regular sugar will be added to the beer (priming) so the still alive yeast can consume it and generate the CO2 that will carbonate our beer in the closed bottle, also called natural carbonation.. When using kegs and forced carbonation, no priming is required.

  • Wyeast American Ale 1056 - Smack pack. I like using this yeast that comes on a smack pack that contains the yeast in dormant state and a sealed nutrient bag inside. The bag is kept cool in the fridge and couple hours before our brew section start, we pop the inner bag with the nutrient so the yeast can be activated prior for pitching into the wort. It will inflate indicating that CO2 is been generated, therefore the yeast is active and ready to pitch. There are many different types of yeast for many different types of beer, some are a dry powder that needs to be re-hydrated, some are liquid, but all goes to personal preferences. Remember to keep it cool and avoid over heating the bad when transporting it from your LHBS.

  • 1oz of Cascade Hop and 1oz of Saaz hop - Pellets. Hops are called the spice of beer. It is a flower that gives the characteristic taste and aroma to a beer. It also helps to prevent the beer from spoiling and expand the shelf life. Hops are mostly available in two forms, leaves or pellets. I prefer using leaves, but for this recipe, pellets will be easier for a first batch ever.

  • 1 cup of priming sugar. As stated previously, sugar will be added prior to bottling for natural carbonation. This can be regular table sugar or priming sugar from your LHBS. For a 5gal batch of beer, only 1 cup of sugar will be needed.

  • 1 tea spoon of irish moss. This dry seaweed is used to help coagulate the proteins in the work when boiled, so it will decant easily to the bottle of the fermenter and provide a more clear beer when racking the beer of the fermenter. Any LHBS carry this item.

Here are the recipe numbers:


OG = Original gravity = 1.050


Expected FG = Final gravity = 1.004


Alcohol by volume = 6.1%


Bitterness = 27IBU


Color = 9SRM


Now some quick explanation of each of these numbers:


OG or original gravity is the expected density of the liquid that will be used for fermentation. That tell us how much sugar the wort will contain, what will determine how much alcohol the fermentation will produce. Distilled water would have a gravity of 1.000. This will be measured using the hydrometer, using a wort sample just before pitching the yeast. The OG can be calculated by formulas that estimate the amount of sugars that each malt extract contains, by its weight, brand and type. Tools are available on-line and many are free to use. Certain OG's are recommended for each style of beer and that information can also be found on-line.


FG or final gravity is the final density of the beer after the fermentation is completed and indicate the residual concentration of sugar . This number is not 1.000 because some of the sugars from the malt extract are not processed by the yeast, called non-fermentable sugars. It also depends of the strain of yeast used and on its capacity to transform the sugars into CO2 and alcohol. Some strains will provide a better transformation or attenuation than others. Attenuation (%) of a yeast indicate what percentage of the original sugars will be mostly consumed.


ABV or alcohol by volume is the final alcohol concentration of the beer. Again, it depends of the initial amount of sugar available in the wort (OG) and the residual sugars after fermentation is completed. So that been said, a simple formula can estimate the abv% by just subtracting the FG from the OG value and multiplying it by a constant of 129 or ABV%=(OG-FG)*129.


IBU or international bitterness unit is a measure of how bitter your beer will be. It is just an estimation that is based on the type of hops used, the amount and the time it is left to boil in the wort. Humulus Lupulus or hops are flowers that contain a resin that when boiled, will dissolve into the wort and spice the beer. Different species of hops have different concentration of compounds that create the bitter taste (alpha acids), as well as a particular taste and aroma. The same web based tools used for OG and FG calculation also estimate the bitterness of a recipe. The ability of one to feel the bitter taste in a beer will also depend on him/his sensibility and to the amount of other ingredients in the beer, as well as the residual sugars or FG. A beer that is light in malt flavor and with low FG will have the bitterness much more perceptible than another beer with same IBU's but with a strong malt flavor and high FG, in which the bitterness can hide and be less perceptible.


Color of a beer is related to the intensity in which the barley malt was toasted and in the case of malt extract, few levels are available for the home brewers. Pilsen malt extract is a very light colored malt, while light, golden, amber and dark would provide each as darker and more toasted flavor when used. This number can also be calculated using the web based tools previously discussed.


Check my next post for the step-by-step process using this recipe.

Saturday, December 5, 2009

Buying your basic home brew equipment


Here's a list of basic equipment for extract brewing of 5gal batches that I think is a good start, from my limited experience.

Some of these can only be found in home brew stores, some in any hardware store like Lowes or HomeDepot. Craigslist is also a good source to find used stuff for great deals, so I would give it a try.


1)Aluminum or Stainless Steel pot, minimum of 6gal or 24Qt. Ideal would be 32Qt or 40Qt. Stainless Steel is much more expensive but easier to clean. Aluminum is also fine, so choose whatever meet you budget. Those turkey deep frying sets are great and comes with the cooker also.


2)Propane outdoor burner. Again, the setup for turkey deep frying would do it all. You can also use your stove top but some are not powerful enough. Those electric with a flat ceramic top are quite powerful and would mostly be fine. Remember, you will need to bring about 5gals of water to a full boil, so you will need as much heat power as possible. If willing to buy a propane burner, the "Bayou Classic’s Kick A Propane Burner" is awesome and about $75 and has plenty of power, about 200,000 BTU's!


3)Wort chiller. This will be used to cool the work after boil. You can build it yourself or buy one from you local LHBS(local home brew store). If you prefer to build one, a 3/8" ID by 30 to 50ft long copper coil works just fine. You will also need to get two pieces of 3/8" ID by 5ft long hose to attached to the coil. I recommend to use stainless steel clamps to secure the hoses to the coil. You will need one adapter 3/8" barb to Garden Hose in order to connect the water to the chiller. If using the faucet in
your kitchen, get one adapter to adapt the kitchen faucets to garden hose type threads.

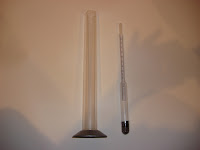
4) Hydrometer. This will be used to measure the quantity of sugars in your wort and during fermentation. As the yeast works the sugars into CO2 and Alcohol during fermentation, the sugar levels drops and by measuring that we can identify when the fermentation is completed and the alcohol potential of a given wort.


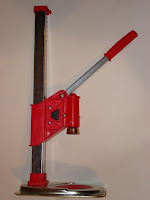
5) Bottle caper. If using regular bottles, a table bottle caper as seen here is the best option. Some other types are available on LHBS but are not as stable and easy to use than this one. Regular 12 or 22oz bottles can be bought on LHBS, or used beer bottles (not the screw in types) can also be re-used. Other option for bottling are plastic pet types and flip-top bottles, also good choices.


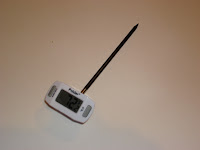
6) Thermometer. A good thermometer is required for home brewing. I will be use to make sure your wort was cooled enough to pitch the yeast and later, if moving to All grain process, even more important. I recommend any digital kitchen thermometer, like the photo here. These cost under $20 and are very precised and easy to use. Dial type thermometers are also used for home brewing. In any case, a calibration test is recommended to make sure it is accurate enough. That can be done by testing it on 32F(freezing point) water and 212F (water boiling point).


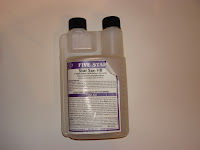
7) Sanitizing solution. This a must and I recommend Star-san. All equipment that will be in contact with the beer after the wort was chilled, needs to be sanitized to prevent contamination than can ruin a beer batch. Usually those equipments are let soaking for few minutes.


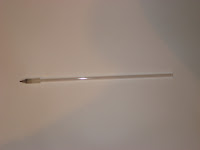
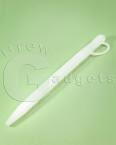
8)Bottle filler - This is used to fill the bottles from down up so the beer does not aerate and avoid oxidation, what can result in shorter shelf life and changes in taste.


9) Bottle washer - This is attached to a faucet and is a valve that releases a nice water jet up inside the bottle as you press the bottle down against it and is the easiest way to clean your bottles before sanitizing then for filling. It will attached to the same adapter mentioned on the wort chiller.


10) Fermenter stopper and airlock- It will close the fermenter and provide an isolation , allowing the CO2 generated during fermentation to scape but blocking the external air to contaminate the wort.


11) Carboy - Usually two are required. One will be used as your fermenter and the other as a temporary reservoir to be used to prime the beer once fermentation is completed, then used to fill the bottles or kegs. I recommend this one from better bottle, 6gal size. Glass carboys are also found but are not as safe as these. These food grade plastic carboys can be drilled so spigots can be attached to provide easy access to the beer either for testing the sugar levels or to transfer to the priming/bottling carboy.


12) Other - These include a big funnel, a strainer, a long spoon, bottle caps, a 5gal plastic container to hold the sanitizing solution, hoses for transferring beer and wort, a beer thief with will help to get samples for gravity test and a adhesive thermometer that you will stick to the fermenter to keep track of the fermentation temperatures.

This list is what I can remember right now and is based on my personal experience. Some brewers have different preferences and that's ok. The more feedback you get before starting and buying your equipment the better. Do a lot of research on the web, visit your local LHBS, home brew clubs and on-line home brewing forums to make sure you will be spending your buck wisely.


Friday, December 4, 2009

Starting to home brew beer.


To help someone to decide whether to start home brewing or not, here's the answer to 3 basic questions:
  1. How does it taste? Can I brew something as good as the commercial brands? Answers is yes, you can brew beer that is actually better than commercial brands.
  2. How long does it take to brew beer? Answer is depends, some beer may take as quick as 3 weeks from start to drink it, some my take several weeks. The brewing by itself takes about 3h for malt extract brewing and 5 to 6h for all grain brewing. These two options will be explored in detail on later posts.
  3. How much does it cost in equipment to start? Basic equipment runs around $200. Cost of ingredients to brew 5gals of beer cost about $40, which translate to about $1 per 12oz bottle.
I guess that a basic understanding of the process is in order, so you can first have an idea of what you are getting into and make a decision if this is something you will enjoy doing.
The reason behind brewing is the need to produce an alcoholic beverage, which some say was the main reason why it all started thousands of years ago, when mind altering methods were extremely valuable. At that time and mostly by mistake, one left a sweet liquid unattended that fermented naturally and later found it would give a buzz to those that consumed it. The first brew was born and today, not much has changed.
We are still looking for the buzz and the basic process is to let a sweet liquid (wort) to ferment in a more controlled environment. The sugars used for beer come from barley malt and fermentation from selected yeast strains. The yeast will transform the sugars into CO2 and alcohol and that is it, you have beer.

Barley malt is a grain that is soaked in warm water and let to germinate. Once the germination process reach a desired phase, the temperature is increased to stop the process. The grain now has enzymes that will later be activated to convert the starches into sugars.

The conversion is obtained by soaking the crushed barley malt in hot water at precised temperatures so the enzymes can be activated. 150 to 160F is the most common range used for this process called "mashing". Once the grains are left to rest for usually 1 hour, the sweet liquid is drained and called "wort", to be used for fermentation.

The process to obtain the sugars from the malt by mashing the grains is called by home brewers "All grain", and is the more advanced of the the two options that home brewers have. It gives lots of flexibility as the brewer can choose the malts (grain bill), temperature of mashing and other variables.

Many producers of barley malt do the mashing part of the process themselves, then reducing the sweet liquid (wort) to a concentrated syrup (malt extract), that is sold and used by home brewers to simplify the process.
So to start brewing beer at home, the easiest way is to use malt extract. That requires less equipment, takes less time and still produces good beer. Some brewers actually never move away from extract brewing, given the good results achieved once you master the process. But "All grain" process is the ultimate way that most home brewers end up doing since it gives then much more flexibility when doing the mashing themselves.
Here's a quick description of the whole brewing process using malt extract.
  1. Dissolve the malt extract in water and boils for 1h, adding spices and other additives.

  2. Cool the wort to room temp (70-80F) and pitch the yeast.

  3. Let it ferment for couple of days until fermentation is completed

  4. Bottle the beer

  5. Let it sit for few weeks to clear and mellow the flavors.

  6. Enjoy your homemade beer.

There is a lot more to each of these steps, but not rocket science at all. On my next post, I'll add a list of basic equipment to start home brewing and further, a recipe and step by step process for a first batch of homemade beer.


Why home brewing?


This is the first post of this blog so I thought I should start by just explaining why home brewing beer is such an interesting hobby.
Unlike other hobbies , home brewing let you be in control of a such large number of variables that it is hard to become a boring activity. There is always something new to try, some new ingredient, a new method.

You don't need lots of money to start home brewing and weather is not a factor since you can brew indoor or outdoors.
As every hobby, brewing in U.S.A has an amazing industry behind it and either local or on the web, support is always easily available. Home brewing clubs are everywhere where you can share your experiences and learn with others.
Beer has been brewed for thousand of years and the process has really not changed much. Technology has increased productivity and consistency but the fun and the challenges are still there to make this hobby an exciting experience.
Contrary to what most people think when they hear of "home made beer", home brewers are able to produce a much higher quality beer when comparing to commercial brands. Because home brewers are not looking for profits, their crafted beers has lots of flavors and aromas that would not be competitive if commercially produced. Also, because crafted beers are not intended for long shelf lasting, no preservatives are used, what also contributes to higher quality.


This blog is intended to share my experiences, recipes, techniques and links to other sources of information on the web. That been said, feedback will always be welcome and appreciated.